이번 글에서는 이전 글에서 입력받은 사용자의 데이터를 서버에 저장하는 기능을 추가로 구현한다.
가장 먼저, 데이터 전송에 사용할 DTO 객체를 만들어 두자.
앞으로 프로젝트가 발전해 나가면서 우리는 일반 파라미터들 대신 DTO 객체를 받아 올 것이다.
@Data
@NoArgsConstructor
public class PostingDTO {

    int idx;
    String title;
    int user_idx;
    String content;

    public PostingDTO
    (String title, int user_idx, String content) {
        this.title = title;
        this.user_idx = user_idx;
        this.content = content;
    }

    public Posting getPostingObj(){
        return new Posting(this.title, this.user_idx, this.content);
    }
}
추가적으로 DTO 객체에서 실제 Entity 객체를 얻어올 수 있도록 getXXXObj() 메서드를 함께 구현하였다.
이는 서비스, 또는 컨트롤러 계층에서 DTO를 Entity로 전환하는 코드를 최소화 하기 위함이다.
서비스 계층
다음으로, 서버에 저장하기 위해 새로 서비스 계층인 PostingService를 구현한다.
@Service
public class PostingService {
    @Autowired
    PostingDAO postingDAO;
    @Autowired
    UserDAO userDAO;

    public void savePosting(PostingDTO postingDTO) throws SQLException {
        Posting posting = postingDTO.getPostingObj();
        User user = userDAO.findUserByIdx(/*postingDTO.getUser_idx()*/ 1);

        postingDAO.save(posting, user);
    }
}
아직 유저 정보에 관련된 기능들의 구현이 진행되지 않았기 때문에, 임시적으로 사용자 인덱스를 1로 기본값을 사용하였다.
이전에 구현했던 postingDAO.save() 메서드를 활용해 데이터를 저장하였다.
컨트롤러 계층
이제, 이전의 컨트롤러 클래스에서 방금 만든 서비스 계층의 저장 로직을 호출해 준다.
@PostMapping
public ModelAndView posting(HttpServletRequest request) throws SQLException {
    String title = request.getParameter("title");
    String content = request.getParameter("content");

//== 새로 추가된 코드 ==//
    postingService.savePosting(new PostingDTO(title, 1, content));

    ModelAndView mv = new ModelAndView("view/posting/readPosting")
            .addObject("title", title)
            .addObject("content", content);

    return mv;
}
결과 확인

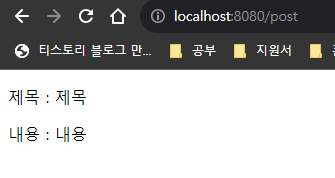
위와 같이 입력한 포스팅에 대해

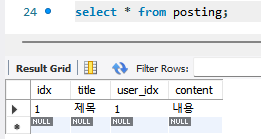
잘 저장된 데이터를 확인할 수 있다.
'프로젝트 > selfmade Blog - V1 (deprecated)' 카테고리의 다른 글
| 10. 테스트 DB 서버 분리 (0) | 2023.08.31 |
|---|---|
| 9. 유저 관련 기능 - 회원가입 (0) | 2023.08.31 |
| 7. MVC 구현 (0) | 2023.08.20 |
| 6. 유저 CRUD 구현 및 테스트 데이터 삭제 (0) | 2023.08.13 |
| 5. 블로그 글 수정, 삭제 기능 (0) | 2023.08.13 |


댓글