이번 글에서 MockMVC를 사용해 Form 데이터를 전송하는 요청을 만들어 보자.
<Form> 태그 데이터의 전송
MockMVC를 알아보기 전에 Form 태그의 데이터 전송 방법을 먼저 알아보자.
Http 통신에서 데이터는 파라미터, 또는 메시지 바디를 통해 전송된다.
그렇다면 form 태그를 통해 입력된 데이터는 어떤 방식으로 전송될까?
아래 코드는 개인적으로 진행하고 있는 프로젝트의 뷰의 일부이다.
<!-- URL : /user/join -->

<form action="user.html" th:object="${userClass}" th:action method="post">
    <div>
        <label for="userName">이름</label>
        <input type="text" id="userName" th:field="*{userName}" placeholder="이름을 입력하세요">
    </div>
    <div>
        <label for="id">ID</label>
        <input type="text" id="id" th:field="*{id}" placeholder="ID를 입력하세요">
    </div>
    <div>
        <label for="password">비밀 번호</label>
        <input type="password" id="password" th:field="*{password}" placeholder="비밀번호를 입력하세요">
    </div>

    <button type="submit"> 회원가입 </button>

</form>
회원 가입 버튼을 누르면 /user/join URL로 Post 요청을 보내게 된다.

회원 가입 요청에 대해 다음과 같은 요청을 확인할 수 있다.

Payload에서 데이터 역시 확인할 수 있다.
조금 더 데이터를 자세히 보기 위해 Controller를 다음과 같이 만들어 보자.
@Controller
@RequestMapping("/user")
public class UserController {

    final static String userViewPath = "user";


    @Autowired
    private UserService userService;

	//...

    @PostMapping("/join")
    public String saveUser(@ModelAttribute WebUser user,
    				HttpServletRequest request,
                            @RequestBody String body) {

        System.out.println("parameters : ");
        for(Map.Entry<String, String[]> entry : request.getParameterMap().entrySet()){
            System.out.print(entry.getKey() + " : ");
            for(String value : entry.getValue()){
                System.out.print(value + " ");
            }
            System.out.println();
        }
        System.out.println();

        System.out.println("body : " + body);

        System.out.println(user.getUserName() + ", " + user.getId() + ", " + user.getPassword());
       //...
            return "redirect:/user/" + savedId;
    }

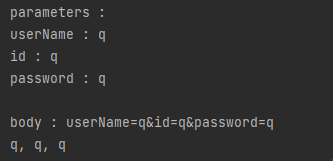
위와 같은 결과를 확인할 수 있다.
일단, 가장 확실한 것은 @RequestBody로 받아온 파라미터에 대해 출력 값이 있는 것으로 보아 폼 데이터는 메시지 바디에 담겨 전송된다는 것이다.
<Form> 태그 데이터의 전송
<Form> 태그를 통해 입력된 데이터가 POST 요청으로 전송될 때는 위와 같이 쿼리 파라미터와 동일한 형식으로 key1=value1&key2=value2,,, 의 형식으로 저장된다. 다만, 해당 쿼리 데이터는 메시지 바디에 담겨 전송된다.
추가적으로, POST 요청은 content-Type 헤더를 가지는데, <form> 태그를 통해 데이터를 전송할 때는 Content-Type=application/x-www-form-urlencoded 의 헤더를 가진다.
Spring의 데이터 파라미터 생성
일반적으로 Spring은 @ModelAttribute와 @RequestBody 두 가지의 방법으로 데이터를 받을 수 있다.
(@ModelAttribute가 @RequestParam으로 값들을 받아와 새로운 객체를 생성해 주는 기능을 제공해 준다는 것을 알고 넘어가자.)
@ModelAttribute는 일반적으로 URL에 포함되는 query parameter의 값을 읽으며, @RequestBody는 메시지 바디에 들어 있는 값들을 읽는다.
하지만, Form 데이터로 전송된 (즉, Content-Type=application/x-www-form-urlencoded 헤더를 가진) 요청에 대해서는 @ModelAttribute가 메시지 내부에 있는 Form 데이터를 읽어 객체를 생성해 준다.
MockMVC에서 Form 태그 데이터 전송 요청 만들기
마지막으로 MockMVC에서 Form 태그를 통해 데이터가 전달되는 POST 요청을 만들어 보자.
1. 실제 동작과 동일한 요청 만들기
MvcResult result = mockMvc.perform(post(joinUrl)
                            .content("userName=" + user.getUserName() +
                                    "&id=" + user.getId() +
                                    "&password=" + user.getPassword())
                            .contentType(MediaType.APPLICATION_FORM_URLENCODED))
            .andReturn();
실제 HTTP 요청 메서드와 동일하게 쿼리 파라미터 형식의 문자열로 데이터를 표현하고, contentType을 application/x-www-form-urlencoded 로 설정해 주는 방법이 있다.
이 경우 Controller의 @ModelAttribute는 Content-Type을 확인 후 메시지 바디를 분석해 적절한 객체를 생성해 줄 것이다.
그러나, 위와 같이 문자열을 하나하나 만들어 주는 것은 번거롭다.
2. request param 데이터로 넘기기
다음 방법은 request param으로 동일한 값들을 넘겨 주는 것이다.
MvcResult result = mockMvc.perform(post(joinUrl)
                .param("userName", user.getUserName())
                .param("id", user.getId())
                .param("password", user.getPassword()))
        .andReturn();
@ModelAttribute는 일반적인 경우 쿼리 파라미터의 값을 사용한다는 것을 기억하면 위와 같이 파라미터들을 사용해 주는 것으로도 문제없이 적절한 요청 데이터를 만들어 줄 수 있을 것이다.
정리
이번 글을 통해 <form> 태그의 데이터가 어떤 식으로 전송되는지, 그리고 해당 데이터를 Spring에서는 어떻게 사용할 수 있는지를 알아보았다.
또, RequestBuilder로 MockMvc 요청을 만드는 방법까지 알아 보았다.
'스프링' 카테고리의 다른 글
| [JPA] 변경 감지와 @Transactional (1) | 2023.12.23 |
|---|---|
| BindingResult 테스트하기 (0) | 2023.10.17 |
댓글